

How To Install LOYO 9 inch LED Headlights with RGB Halo
LOYO 9” Diamond LED Headlights with RGB halos are an excellent way to upgrade the visibility and appearance of your 2018-2021 Jeep JL. These Diamond Headlights feature note only high output white LED lighting that will certainly be much brighter than your factory incandescent headlights. But also great looking integrated multi-color accent halos that will add unique custom lighting effects to your Jeep's exterior. Lighting options include a full array of colors, as well as strobe, fading, flashing, running modes and solid modes.
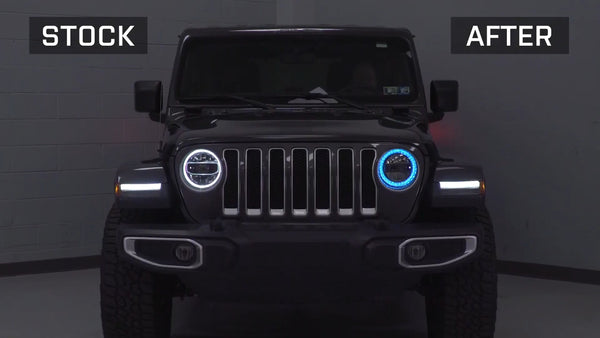
The free App takes your lighting experience to the next level, granting you the power to effortlessly adjust colors, brightness, and modes, all from the convenience of your smartphone. Immerse yourself in a world of captivating visuals, infusing your Jeep with an irresistible allure that turns heads wherever you go.
Installing the 9 inch RGB Diamond LED Headlights in your Jeep is a straightforward process, with the physical part being relatively easy. However, the wiring aspect might require some additional steps. In this tutorial, we will guide you through the installation process, providing shortcuts and tips to simplify the wiring. With our instructions, you should be able to complete the installation in approximately an hour. Let's begin by reviewing the tools you will need.
Tools required in installation
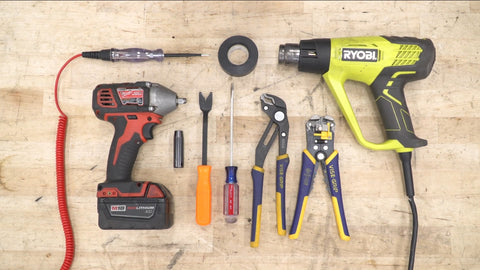
- Circuit tester
- Electrical tape
- A heat gun
- Electric impact wrench
- A 10-millimeter socket
- Trim removal tool
- Flat blade screwdriver
- Pair of Piers
- Wire stripper crimper tool
Step1: Remove the grille

- Use a trim removal tool or a flat blade screwdriver to raise the center pin of the locking pins on the grille.
- Once the center pin is raised, remove the base of the locking pin.
- Repeat this process for all locking pins along the top of the grille.There are six of them across the top
- Firmly pull the grille to detach it from the pinch tabs along the bottom line.
- Now you can get access to the hardware that holds factory headlamps into the jeep
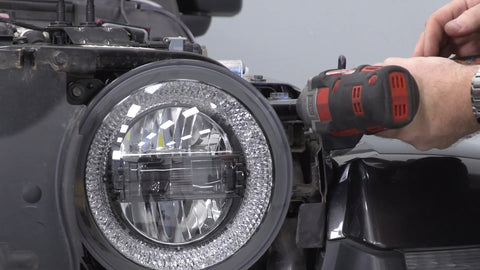
Step 2: Removing the Factory Headlights
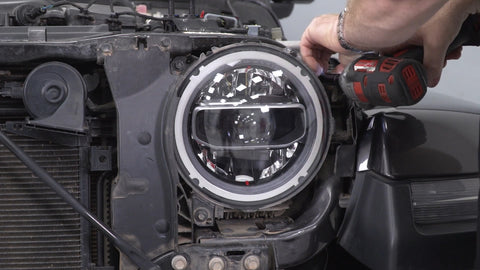
- Locate the three 10-millimeter bolts securing each headlight.
- Use a 10-millimeter socket and an electric impact wrench to remove the bolts.
- Carefully pull out the factory headlights and disconnect any electrical connections.
- Step 3: Wiring Preparation
Step 3: Wiring Preparation
①Red Wire For RGB Halo
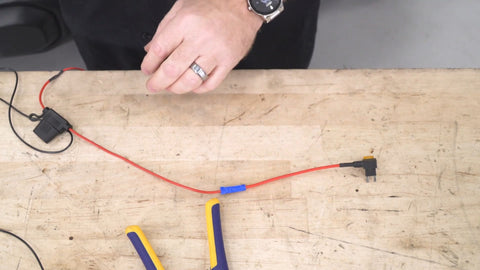
- Acquire a fuse tap, which allows you to connect to the fuse box for a key on power source.This power will be only present when you turn on your vehicle and start the engine.
- Connect the red wire from the wiring harness to the fuse tap, ensuring a tight connection.
- Crimp the connection securely and test it by attempting to pull it out.
- Wrap the connection with electrical tape for further protection.
② Ground lead connection

- Splice a connector onto the exposed wire from the wiring harness.
- Strip the wire further if needed to expose more of it.
- Connect the ground lead to the negative post on the battery using the connector.
- Crimp the connection tightly and use a heat gun to secure any heat shrink tubing if applicable.
Step 4 Traffic Law Connector to to the high/low beam
①Identifying the high beam/low beam activation wire

- Use a circuit tester tool to identify the wire responsible for activating the high and low beams.
- Tap the probe onto different wires until the tool lights up, indicating power.
- The wire that activates the high beams will cause the tool's light to turn on and off as the high beams are cycled.
- Follow this wire through the plug, identified as a white wire with a green stripe.
- That is the one we're gonna splice into with the yellow wire and the wiring harness for this headlight.
②Splicing the connector
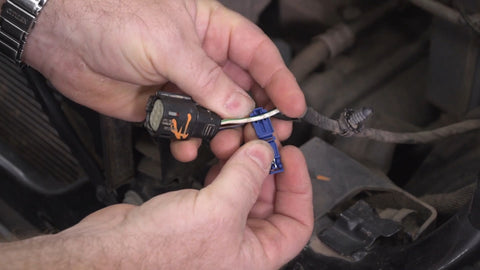
- Take the T-connector from your kit and place it in the channel near the identified wire.
- Use pliers to firmly squeeze the T-connector onto the wire, ensuring a secure connection.Make sure to isolate the wire from the others to prevent damage.
- Use a connector to splice onto the yellow wire, test the connection by pulling on it to ensure it is secure.
- Wrap the connection with electrical tape for added protection.
③Plug the yellow wire into the T-connector
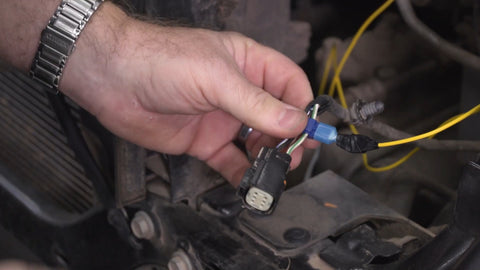
Ensure that the metal spade on the connector slides inside the corresponding connector. If the metal spade is still visible after plugging it in, the connection is not secure.
Adjust the connector until the metal spade is fully inserted and hidden within the connector.
Step 5: Ground wire connection

- Attach the connector from the ground wire to the auxiliary post for the negative terminal on the battery.
- Ensure a secure connection and use pliers if necessary to tighten the connector.
Step 6: RGB wire connection

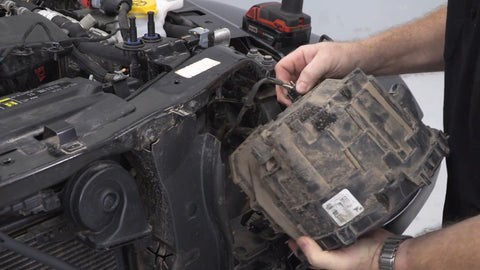
- Locate the fuse box in your Jeep and refer to the diagram on the underside of the lid.
- Look for a fuse spot that provides power only when the engine is on.
- In this case, F52 is the designated spot for the cigarette or cigar lighter fuse, which is only powered on when the engine is on.
- Remove the existing fusetap from F52 and insert the T-connector into the slot.
Step 7: Installing the headlight
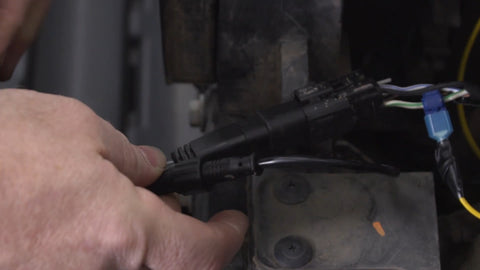
- Connect the driver-side headlight to the factory wiring harness.
- Plug in the additional wire from the new headlight wiring harness (control box)
- Screw down the cap to secure the connection.
- Bolt the headlight in place.
- Repeat the same steps used for theanother side headlight installation.
- Once completed, proceed to replace the grille.
Step 8: Reinstalling the pop clips
- Place the pop clips back into their corresponding positions.
Congratulations! You have successfully installed the 9 inch RGB Diamond LED Headlights in your Jeep. By following this tutorial and utilizing a fuse tap for a key on power source, you have ensured the full functionality of the color-changing effects and other features. If you have any further questions or need assistance, don't hesitate to reach out. Enjoy your upgraded headlights!


